Tuesday, October 20, 2009
KidSteals
A new website has joined the Baby Steals and Scrapbook Steals family. The e-doors of KidSteals.com are now open! Yes, it's just like BabySteals but for your toddlers and kids! Hot products at the best price from the best brands in the industry, every day at 9am MST.
All this, with the same level of fanatical customer service and lightning fast shipping you are used to from BabySteals.com and ScrapbookSteals.com! Visit and sign up for the KidSteals Daily Steal E-mail Alert so you never miss a steal.
Friday, October 2, 2009
Easy Table Runner
- 3 - 4 different fabrics - I used 1 yard for the middle section, 1 1/3 yard for the smaller stripe and back, and 2/3 yard for the end piece.
- Thread
- 1 yard fusible interfacing
- Sewing machine, sewing notions
Cost: variable, depending on your fabric
**All seam allowances are 1/4"**
Instructions:
1. Cut your fabric to the following lengths:
a. middle piece: 36" x 18"
b. smaller stripes: 6" x 18" (2)
c. end stripes: 12" x 18" (2)
d: back: 36" x 18" (2)
2. Lay your fabric out to create the design of the table runner.
3. Pin right sides together and sew the top of the runner.
4. Pin your back piece (right sides together) and sew together.
5. Cut your interfacing to fit the table runner (2 pieces of 36" x 18"). Following the interfacing instructions, iron the interfacing to the wrong side of your back piece.
6. Pin the front and back pieces of your table runner (right sides together) and sew it together, leaving a 6" opening.
7. Turn the table runner right side out and iron smooth. Pin the opening edge of the runner and sew closed.
Wednesday, September 16, 2009
Why You Seriously Should Consider Couponing...
...for about 70 cents!!!
Between the sale Alberton's was having, my manufacturer coupons, Albertson's doubler coupons, and the $5 catalina I got back, this cost me less than 70 cents total. If you are interested in learning more about couponing, I highly recommend that you visit the Krazy Coupon Lady or Coupon Addicted. They can teach you all that you need to know to get started!
Friday, August 7, 2009
Modbe Clearance!
Wednesday, July 22, 2009
Beyond the Rack
Monday, July 13, 2009
Paint Deals Cont....
Thursday, July 9, 2009
Paint Deals
Can You Do Me a Favor...
Wednesday, July 8, 2009
Scrapbook Steals
All with the same level of fanatical customer service and lighting fast shipping you are used to from BabySteals.com! New steal daily - 9am MST."
Tuesday, June 16, 2009
Baby/Child Hooded Towel
2. Fold the washcloth in half, with right sides together. Pin the top of the washcloth and sew a narrow hem (about 1/4").
3. Turn the washcloth (now the hood for your towel) right side out. It will probably look something like this:
4. Center the hood on the top of the towel, right sides together. Pin in place and sew, using a 1/4" hem.Saturday, May 16, 2009
Baby Bibs
These baby bibs are way cute and are super easy to sew!
This instructions and pattern for this bib came from Chickpea Sewing Studio.
You will need:
- Fabric: 1/3 yard fun fabric for the front, 1/3 yard coordinating flannel, terry cloth, corduroy, etc for the back.
- Thread
- Snap
- Pattern
Directions:
- Prewash fabric.
- Fold one piece of fabric (wrong sides together) and pin the pattern along the fold. Cut the pattern out. Repeat for the other side of fabric.
- Pin the front and back, wrong sides together. Sew the front and back together using a double stitch and 1/4 inch seam allowance. Leave a small opening (about 1") for turning.
- Turn the bib inside out and press with a warm iron.
- Edgestich around the bib, making sure that the open hem has been tucked in. The edgestich should sew the open end closed.
- Attach snaps.
Sunday, May 3, 2009
Baby Receiving Blanket
2 (45") pieces of coordinating flannel fabric (one piece for front, one for back)
Matching thread
Salad plate (if rounding corners)
Rotary cutter and mat or scissors
Sewing machine and notions
Instructions:
- Pre-wash and iron fabric, trim ends
- Pin right sides of fabric together
- For rounded corners: use a salad plate as a pattern, and place it in the corner of the fabric. Cut around the outer edge of the salad plate to create a rounded edge.
- Using a 1" seam, sew the edges of the flannel together. Leave a small opening (about 4-6").
- Turn the blanket right side out through the opening.
- Pin the open edge of the blanket closed.
- Sew a decorative stitch (I used a zig-zag), around the edge of the blanket using a 3/8" seam. This stitch should sew the open edge of the blanket closed.
Wednesday, April 29, 2009
Free Shipping and Other Great Deals
You can also try googling "coupon codes" to get several other results. These are the ones that I have tried...I use currentcodes most frequently.
Tuesday, April 28, 2009
Shop it to Me: Your Free Personal Shopper
http://www.shopittome.com/shhsecret/baa9d542
Monday, April 13, 2009
Ideeli
http://www.ideeli.com/invite/lisapearson
Thursday, March 26, 2009
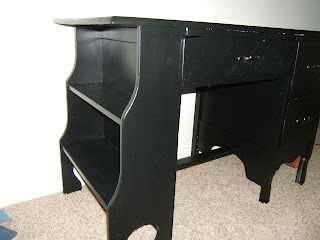
Refurbished Desk
To get started, you will need:
- Furniture to refurbish
- Electric sander
- Paint
- Paintbrush - I used a foam brush to help avoid brush strokes
- Drawer hardware (pulls or handles)
Instructions:
- Wipe down the furniture with a clean, damp cloth.
- Using the electric sander, sand the furniture. If you sand it to the wood (thus removing the old pain), painting will probably be easier.
- Begin painting. Make sure that you apply an even coat. You may need to paint more than one coat in order to have adequate coverage.
- When the paint is dry, apply the new drawer hardware
Here is the finished product: (sorry...these pictures didn't turn out the greatest)
Wednesday, March 25, 2009
Gilt Group
Tuesday, March 24, 2009
Modbe Clearance!
Sunday, March 22, 2009
Accent Pillows
You will need:
- Sewing machine
- Fabric with matching thread*
- A pillow form
*Some fabric stores sell remnant pieces of fabric at great prices. I purchased my fabric from Material Girls Quilts and was able to buy remnant pieces for about $5/pillow.
Directions:
- Cut the fabric that will be used for the front of your pillow into a square that is approximately 1" larger than the size of your pillow form. I cut my fabric into a 16" square because I used a 15" pillow - for the sake of these directions, I will include the measurements that I used for a 15" pillow.
- Cut the fabric that will be used for the back of your pillow into a 16" x 21" rectangle (16" tall, 21" wide).
- Cut the back fabric piece in half, so that you have two 16" x 10.5" pieces.
- Next, hem one side (the 16" side) of each back piece. I made a 1/2" hem.
- Once you have hemmed one side of both back pieces, pin both back pieces to the front pillow piece, right sides together. The hems on the back pieces should be in the middle of the pillow and the fabric should be overlapping.
- Sew the back pieces to the four side of the front pillow piece. I used a 1/2" hem.
- Turn your sewn pillow right-side-out and insert your pillow form. Congratulations - you have an accent pillow!
Friday, March 20, 2009
Steep for Cheap
Steep for Cheap is an online vendor for outdoor clothing and products. They offer one item at a great deal until that item has been sold out. As soon as that deal is sold out, they start another deal. Items can be marked down as much as 50-80%, so deals sell out quickly. The deal changes several times a day, and you can sign up to receive alerts when a new item pops up. Check them out at www.steepandcheap.com.